
TL;DR
Moving your rig out of your main space and into a closet drastically reduces noise and reflections. Proper ventilation and sealing are key to keeping your hardware cool without sacrificing soundproofing. Foam and blankets help control reflections but won’t stop sound from escaping or entering unless combined with strategic placement.
Ever wondered why your noise-canceling efforts fall flat? It’s because most of us focus on absorbing sound rather than controlling where it goes. The best way to quiet a loud rig isn’t foam on the walls — it’s moving it into another room, or better yet, a closet. When you treat a space right, you don’t just make it sound better—you keep your neighbors and family happy, too.
This guide isn’t about fancy gear or expensive acoustic panels. It’s about the simple, effective tricks that make your setup quieter and safer. Whether you’re running a high-power AI workstation or just want less background noise during calls, understanding placement and ventilation makes all the difference.
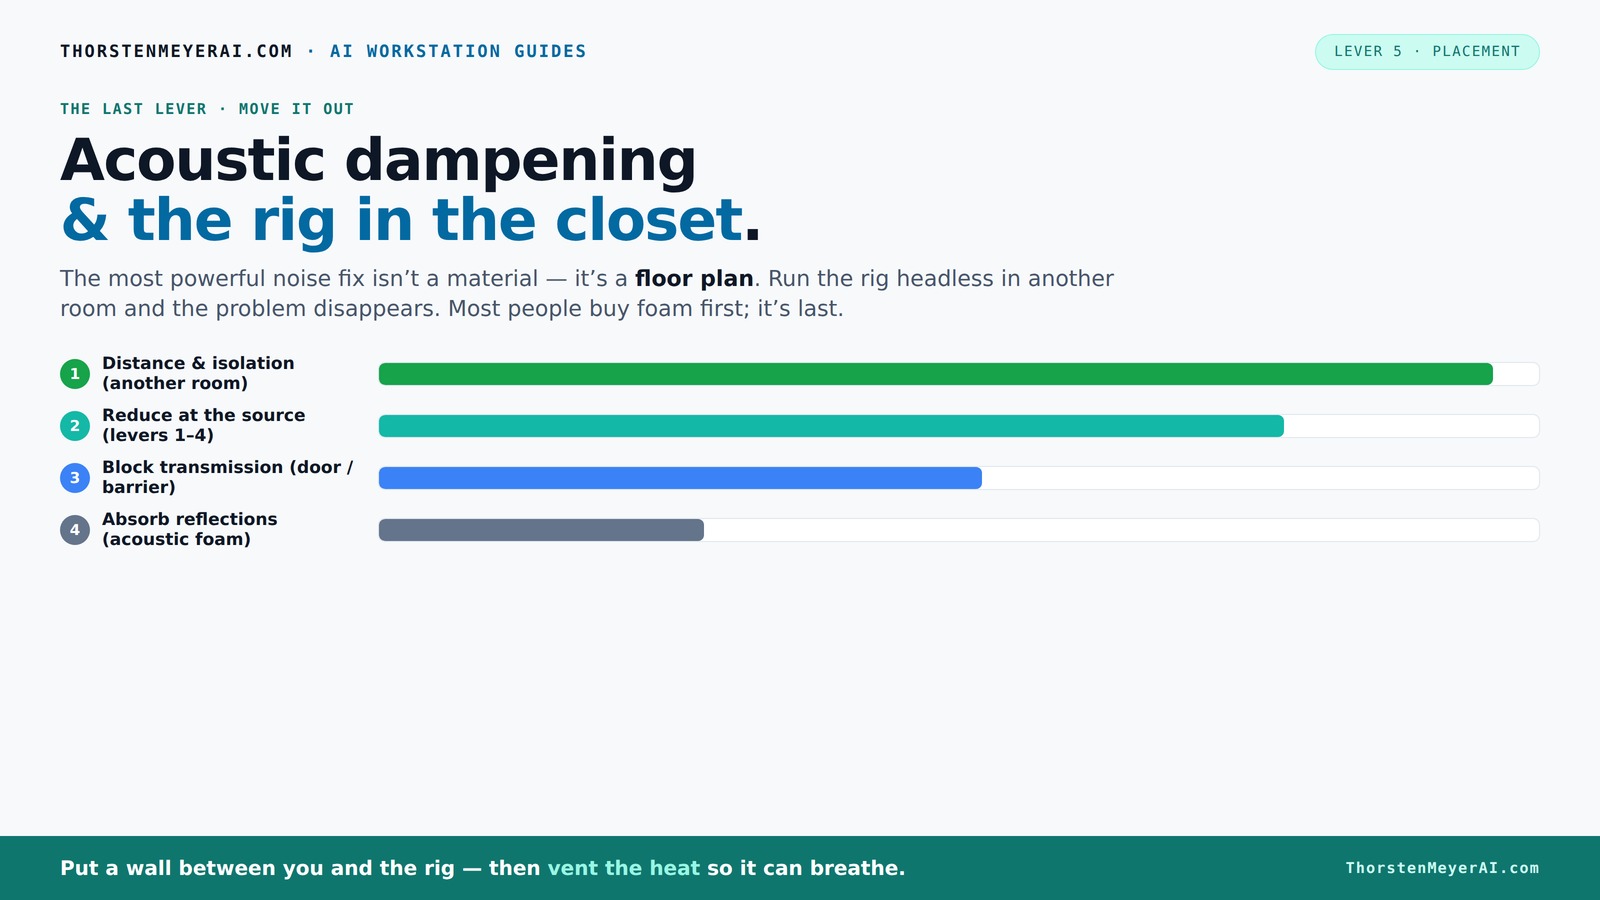
Acoustic dampening
& the rig in the closet.
The most powerful noise fix isn’t a material — it’s a floor plan. A rig you can’t hear because it’s in another room beats any amount of foam. Tap the approaches in Part 1 to see what actually works.
(another room)
(levers 1–4)
(door / barrier)
(acoustic foam)
Contain the noise, not the heat
Key Takeaways
- Moving your rig into a different room or closet reduces noise more than any foam or barrier.
- Proper ventilation in a closet rig prevents overheating, balancing noise reduction with heat dissipation.
- Seal gaps around doors and vents to prevent sound leaks, but don’t block airflow entirely.
- Placement of blankets, acoustic panels, and soft materials near reflective surfaces cuts reflections and improves clarity.
- Don’t over-treat — focus on balanced absorption and sealing for the best sound quality.

20 Pack Acoustic Panels with Self Adhesive, 12" X 12" X 0.4" High Density Sound Proof Foam Panels for Walls, Soundproof Wall Panels, Brick Sound Absorbing Panels for Home Studio Office Decor - White
🔇 Effective Noise Reduction: Design for tranquility, our wall soundproof foam panels are engineered with an exceptional NRC...
As an affiliate, we earn on qualifying purchases.
As an affiliate, we earn on qualifying purchases.
Why Distance and Isolation Beat Everything Else
Distance is the single most effective way to cut noise. Think of it like turning down the volume on your rig—if it’s in another room, your ears won’t even need earplugs. For AI workstations, the setup can be completely headless: you run the rig in a closet, then connect over a fast network. Suddenly, that roaring GPU becomes background noise instead of a constant distraction.
Imagine working on a complex model while the GPU hums in the next room. You can hardly hear it, yet the machine still does its job. This simple shift saves you money on soundproofing, reduces heat worries, and makes your workspace feel peaceful. For most, this is the highest-value fix.
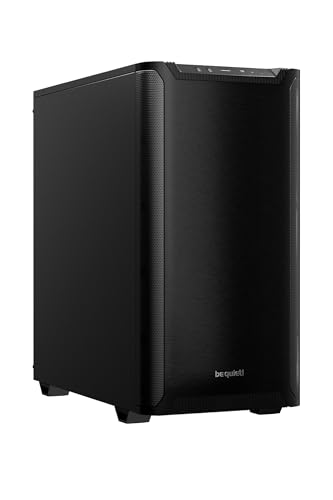
be quiet! Pure Base 501 Black ATX Case | 2 Preinstalled Pure Wings 3 140mm PWM Fans | Optimized Air Pressure | Compact PC Case | Vertical GPU Installation | USB 3.2 Gen. 2 Type C | BG073
Without any distractions, Pure Base 501 is reduced to excel at its core functions and is aimed at...
As an affiliate, we earn on qualifying purchases.
As an affiliate, we earn on qualifying purchases.
The 'Rig in the Closet' Setup — How to Do It Right
Placing a hot, high-load machine inside a closet sounds perfect—quiet and out of sight. But here’s the catch: heat builds fast. Without proper airflow, your rig overheats, throttles, and fans roar louder than ever. The key is to balance soundproofing with ventilation.
Start with a dedicated closet or cabinet that can breathe. Install passive vents or a quiet exhaust fan. Use ducted airflow or purpose-built soundproof enclosures with thermostatic control. Think of it like a mini data center—cooling is essential, or your setup becomes a fire hazard.
For detailed strategies, check out tips on how to [reduce heat and noise in a high-power AI workstation](https://thorstenmeyerai.com/reduce-heat-noise-ai-workstation/). Proper ventilation is the secret to keeping your hardware happy and your space silent.
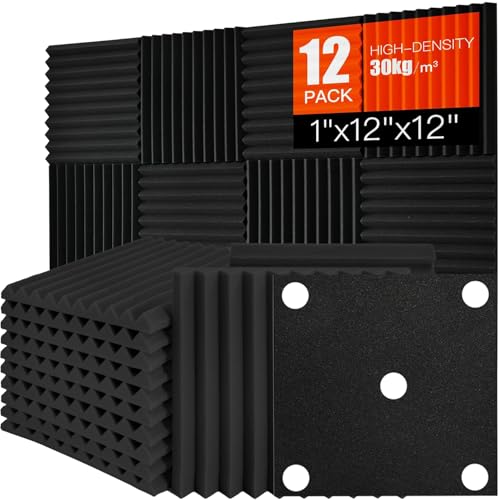
Saiqiang Acoustic Foam Panels Sound Absorbing 12 Pack - 1" X 12"X 12" Sound Proof Panels Noise Reducing for Walls, High Density Sound Deadening Panels Black Wedge for Studio Recording & Office & Home
Professional Sound Absorption for Studios and Podcast Spaces - High-density acoustic foam panels and sound absorbing panels are...
As an affiliate, we earn on qualifying purchases.
As an affiliate, we earn on qualifying purchases.
Acoustic Dampening vs. Soundproofing — What’s the Difference?
Acoustic dampening and soundproofing aren’t the same. Dampening reduces reflections and echoes inside a space—making it sound less harsh. Soundproofing blocks sound from leaking out or coming in.
Understanding why this distinction matters is crucial. Dampening inside a room improves clarity, making recordings sound more natural and reducing muddiness caused by internal reflections. Soundproofing, on the other hand, prevents noise from disturbing neighbors or being disturbed by external sources, which is essential if you're in close quarters. The tradeoff is often between the level of absorption and the cost or complexity of sealing and building barriers. Properly combining both approaches—dampening for internal clarity and soundproofing for external isolation—gives you a balanced, effective acoustic environment.
For example, lining a closet with foam absorbs the echoes bouncing around inside, but if gaps remain around the door or vents, sound will still escape. Sealing those gaps with weatherstripping or acoustic sealant enhances the soundproofing, but this might slightly reduce airflow. The key is to find the right balance: enough absorption to improve your sound quality without trapping heat or creating a sealed, airtight box that could overheat. Recognizing the purpose of each helps you allocate your resources effectively, ensuring your space sounds good without compromising safety or ventilation.

Global Industrial Mobile Security LCD Computer Cabinet Enclosure for 24" Diagonal Monitors, Steel Construction, Blue Powder Coat Finish, 24-1/2"W x 22-1/2"D x 62-3/4"H
Upper compartment interior 24"W x 9"D x 19-1/4"H
As an affiliate, we earn on qualifying purchases.
As an affiliate, we earn on qualifying purchases.
Placement Tips for a Quieter Closet Rig: Get the Details Right
Placement is everything. Here’s how to make your closet setup quieter and clearer:
- Hang blankets or acoustic panels 2–3 inches from the wall behind the rig to absorb reflections and prevent sound bouncing back into the microphone. This minimizes internal echoes that can muddy recordings and interfere with sound clarity.
- Place a rug or carpet under the machine to reduce floor bounce, which can cause low-frequency muddiness and affect the overall sound quality.
- Position the microphone away from reflective surfaces like walls and shelves to avoid picking up unwanted echoes and reverberations. Use angled or diffused placement to improve direct sound capture.
- Cover the closet door with multiple layers of blankets or acoustic blankets to trap sound and reduce leakage. This prevents sound from escaping into adjacent spaces and keeps noise contained.
- Ensure vents and fans are positioned to exhaust hot air without creating noise leaks. Strategic placement minimizes sound escape while maintaining proper airflow, which is vital for cooling and noise control.
For example, hanging thick moving blankets on the closet walls and door can cut sound leakage by 50% or more. Tiny adjustments in placement—such as angling panels or adding additional layers—can significantly improve sound isolation. These small, deliberate changes help balance internal sound quality with external noise containment, especially in tight spaces where reflections and leaks are more pronounced, and even slight modifications can lead to noticeable improvements in clarity and quietness.
How to Seal and Ventilate a Closet Without Losing Silence
The biggest challenge with closet rigs? Heat buildup and sound leakage. The trick is sealing gaps while maintaining airflow. Use weatherstripping or acoustic sealant around the door frame to close leaks without blocking ventilation. Adding a small, quiet exhaust fan helps pull hot air out, but it must be chosen carefully to avoid noise leaks. Strategic ducting can direct hot air outside or into a dedicated ventilation system, ensuring your hardware stays cool without compromising soundproofing.
Here’s a simple step-by-step:
- Seal cracks around the door with weatherstripping or acoustic foam to prevent sound leaks, but leave enough space for airflow.
- Install a passive vent or a quiet exhaust fan that can move air without creating noise leaks—look for models designed for low noise levels.
- Use ducting if necessary to direct hot air outside, away from sensitive areas or into a venting system that doesn’t compromise soundproofing.
- Monitor temperature with a basic thermometer—keep it below 80°C to prevent thermal throttling and equipment damage.
Balancing soundproofing with ventilation involves tradeoffs: sealing too tightly can trap heat, risking hardware damage, while insufficient sealing allows noise leaks. Properly implemented, these measures create a safe environment that minimizes noise transmission while maintaining optimal operating temperatures. Recognizing that some sound leakage may be unavoidable, focus on controlling the most critical pathways and ensuring your equipment remains cool and functional. For more detailed guidance, see the [low-noise PC case airflow guide](https://thorstenmeyerai.com/low-noise-pc-cases-airflow/). Achieving this balance requires some trial and error, but it’s essential for a reliable, quiet, and safe setup.
Do You Really Need Bass Traps in a Tiny Closet?
Bass traps are designed to tame low-frequency build-up—think of the deep thumps from a bass guitar or subwoofer. In a tiny closet, they can make the sound clearer by reducing muddiness caused by standing waves. However, their necessity depends on the space and your use case. If your room is very small and you notice a boomy, muddy low end, adding bass traps in the corners can help tighten the sound and improve clarity.
But beware: over-treating with bass traps can make the room sound unnaturally dry, deadening the natural warmth of your recordings. Start with basic absorption on walls and ceiling to control mid and high frequencies, then add bass traps only if you notice persistent low-end issues. The goal is balanced sound—eliminating excessive resonance without creating a sterile, dead environment. In very small spaces, the placement and quantity of bass traps matter. Use a few strategically placed traps in the corners or along the walls where low frequencies tend to build up, and listen critically to how they affect your sound. Moderation and careful placement are key to avoiding a sound that feels unnaturally dull or overly deadened, which can hamper the natural warmth and character of your recordings.
Frequently Asked Questions
What is the difference between acoustic treatment and soundproofing?
Acoustic treatment reduces reflections and echo inside a space, making sound clearer. Soundproofing prevents sound from escaping or entering the room, blocking noise transmission. Both are important but serve different purposes.
How much foam or blanket coverage do I need in a closet rig?
Start with covering walls and door with thick blankets or acoustic foam, focusing on areas that reflect sound back toward the mic. Usually, layers on walls, ceiling, and door do a good job—more isn’t always better, especially if it makes the space sound dead.
Should I treat the walls, ceiling, or door first?
The door is the weakest point for sound leaks, so sealing and treating it first makes sense. Then, focus on walls and ceiling, especially near the mic and reflective surfaces. Proper placement of absorption and sealing creates the biggest impact.
Do bass traps matter in a tiny closet?
Yes, if you notice boomy lows or muddiness. Bass traps in corners help tame low-frequency build-up, but they’re not always necessary for general voice recording. Use them only if you notice specific low-end issues.
How do I stop reflections from the desk, door, and ceiling?
Use soft materials like blankets or foam panels close to reflective surfaces. Place absorption behind the mic and on the ceiling. Cover the door with blankets or sealing strips. Small adjustments can greatly reduce unwanted reflections.
Conclusion
Your best bet for a quiet, effective setup isn’t just adding foam or soundproofing—it's smart placement and ventilation. Moving your rig into a closet or another room can cut noise by 80%, with minimal cost or complexity. Just remember: airflow and sealing are the real magic—they keep your hardware cool and your space silent.
Next time you think about soundproofing, ask yourself: how can I put distance between me and the noise? That simple shift could be your biggest win. Your workspace will thank you, and your neighbors will too.